A Pinterest Win! Strawberry Chocolate Chip Cake

Strawberry Chocolate Chip Cake - Mom Meets Blog

Like the sailors lured to their doom on a rocky reef by the sweetness of her song, I’ve been known to heed the siren call of Pinterest, the visual social bookmarking site chock full of crafts, recipes, and all manner of creative endeavors from well-intentioned pinners the internet over. I do my fair share of pinning, and while I’ve certainly learned a thing or three, channeling my inner Barefoot Contessa and perfectly executing that glossily photographed salted caramel dulce de leche flan does not come naturally – or at all. To soothe those rankling feelings of inadequacy, I head on over to Pinterest Fail for a little commiseration time-out. Billed as a place where good intentions come to die, it chronicles hopeful pinners’ valiant efforts at replicating those glossily photographed projects, which have met with disastrous results.  Communing with my fallen brethren in creativity gives me the courage to continue my own aspirational pinning, ever hopeful that I will chance upon a recipe I can actually pull off that bears some resemblance to the original.

Such is the case with this Strawberry Chocolate Chip Cake recipe I pinned from Julia’s Album, which she adapted from a Martha Stewart recipe.

Armed with my computer, a pound of strawberries I bought on sale, and a sanguine spirit, I tackled this recipe with surprisingly successful results! Light, delicious and bursting with strawberry-chocolatey yumminess, I’ve made this cake three times so far and taken one to a potluck dinner, where it was met with rave reviews. It usually lasts about two days at my house, and I know it’s a recipe I’ll be making for years to come. Oh, and let me share this direct quote from my son:

“It’s like heaven had a baby, and its name is Strawberry Chocolate Chip Cake”.

High praise, indeed!

Please note that the abundance of strawberries tends to make this cake extremely moist, so it’s best kept refrigerated (where it should keep well for about a week, if it lasts that long!). My son and husband prefer to eat it cold; I like to microwave it for about 10-15 seconds on high so the chocolate chips get a little melty. It can also be frozen for up to 1 month, tightly wrapped in plastic wrap.

Check out the recipe below. My low-tech photos were shot with my iPhone, using the under cabinet lighting in my kitchen. Yeah, I’m no photographer either, but, like the cake, I think they came out pretty good!

Ingredients

  • 1 and 1/2 cups all-purpose flour
  • 1 and 1/2 teaspoons baking powder
  • 1/8 teaspoon salt
  • 3 tablespoons unsalted butter, softened
  • 3 tablespoons Greek yogurt
  • 1 cup sugar
  • 1 large egg
  • 1/2 cup milk
  • 1 teaspoon pure vanilla extract
  • 1/3 cup milk chocolate chips plus more for sprinkling the top of cake (you can use milk chocolate chips or a combination of milk chocolate and semi-sweet chocolate chips)
  • 1 pound strawberries, hulled and halved

Instructions

  1. Heat oven to 350°F. Line the bottom of a 9×3-inch springform pan with parchment paper. Grease the side of the springform pan or square pan with butter or cooking spray.
  2. Combine flour, baking powder, and salt together into a medium bowl.
  3. In a separate large bowl, combine butter, Greek yogurt, and 1 cup sugar and, using electric mixer, beat on medium-high speed until light and fluffy – no more than 2 minutes.
  4. Reduce speed to medium, mix in the egg, beat until light and fluffy. Then mix in milk, vanilla.
  5. Keeping the mixer speed low, mix in the flour mixture, gradually, just until combined. Do not over mix.
  6. Fold chocolate chips into the batter. Transfer batter to springform pan. Arrange strawberries on top of the cake, cut sides down and close together. Place chocolate chips in spaces in between.
  7. Bake cake for about 1 hour until the top is golden brown and the tester comes out clean. OPTIONAL (I skipped this step): In the last 5-10 minutes of baking, you can take the cake out of the oven and sprinkle some more chocolate chips on top, pressing them lightly into the top of the cake (the top of the cake will already be baked and a bit crusty) – it will make for a nice presentation. Return to the oven for 5-10 more minutes, to allow chocolate to melt a bit.
  8. When the cake is done baking, let it cool (still in the baking pan) on a wire rack. After cake has cooled for about 40 minutes, release the cake from the springform pan. At this point, if the cake is cool enough, slide your hand under the cake, between the parchment paper and the bottom portion of the springform pan and move the cake with the parchment paper attached to its bottom onto a cake plate.
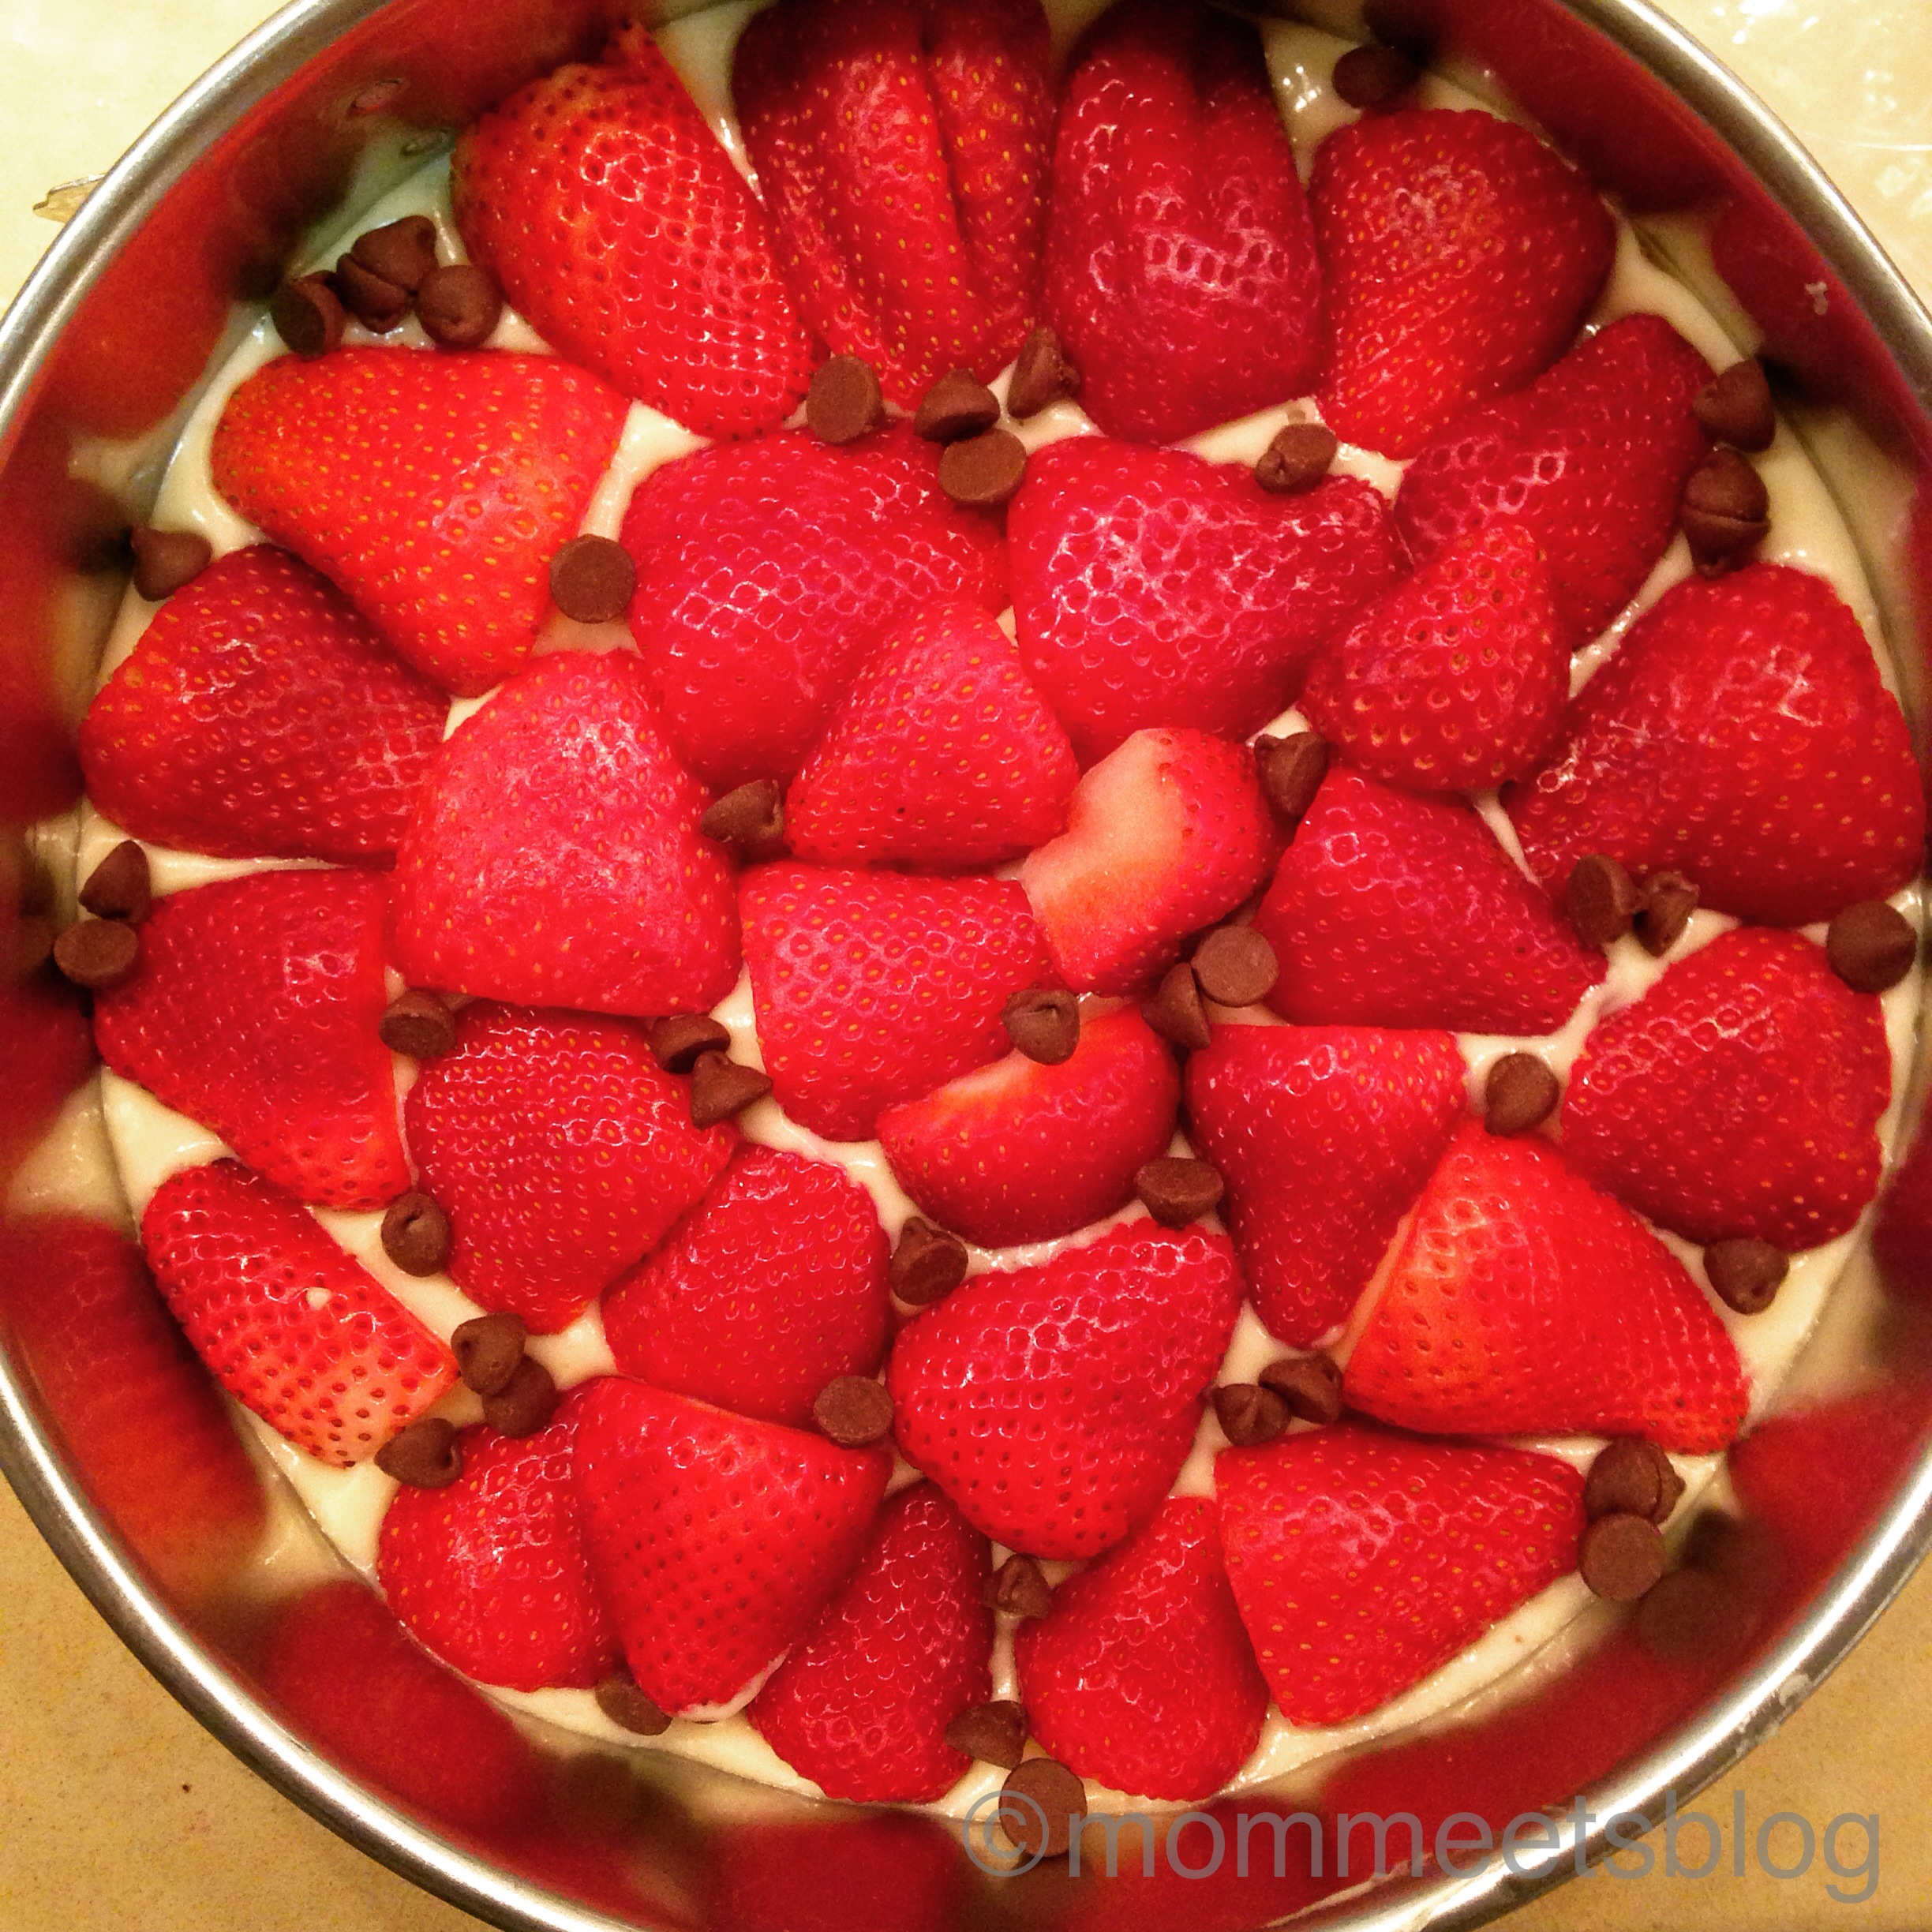
 

Strawberry Chocolate Chip Cake - Mom Meets Blog

 Cake before baking

Strawberry Chocolate Chip Cake - Mom Meets Blog

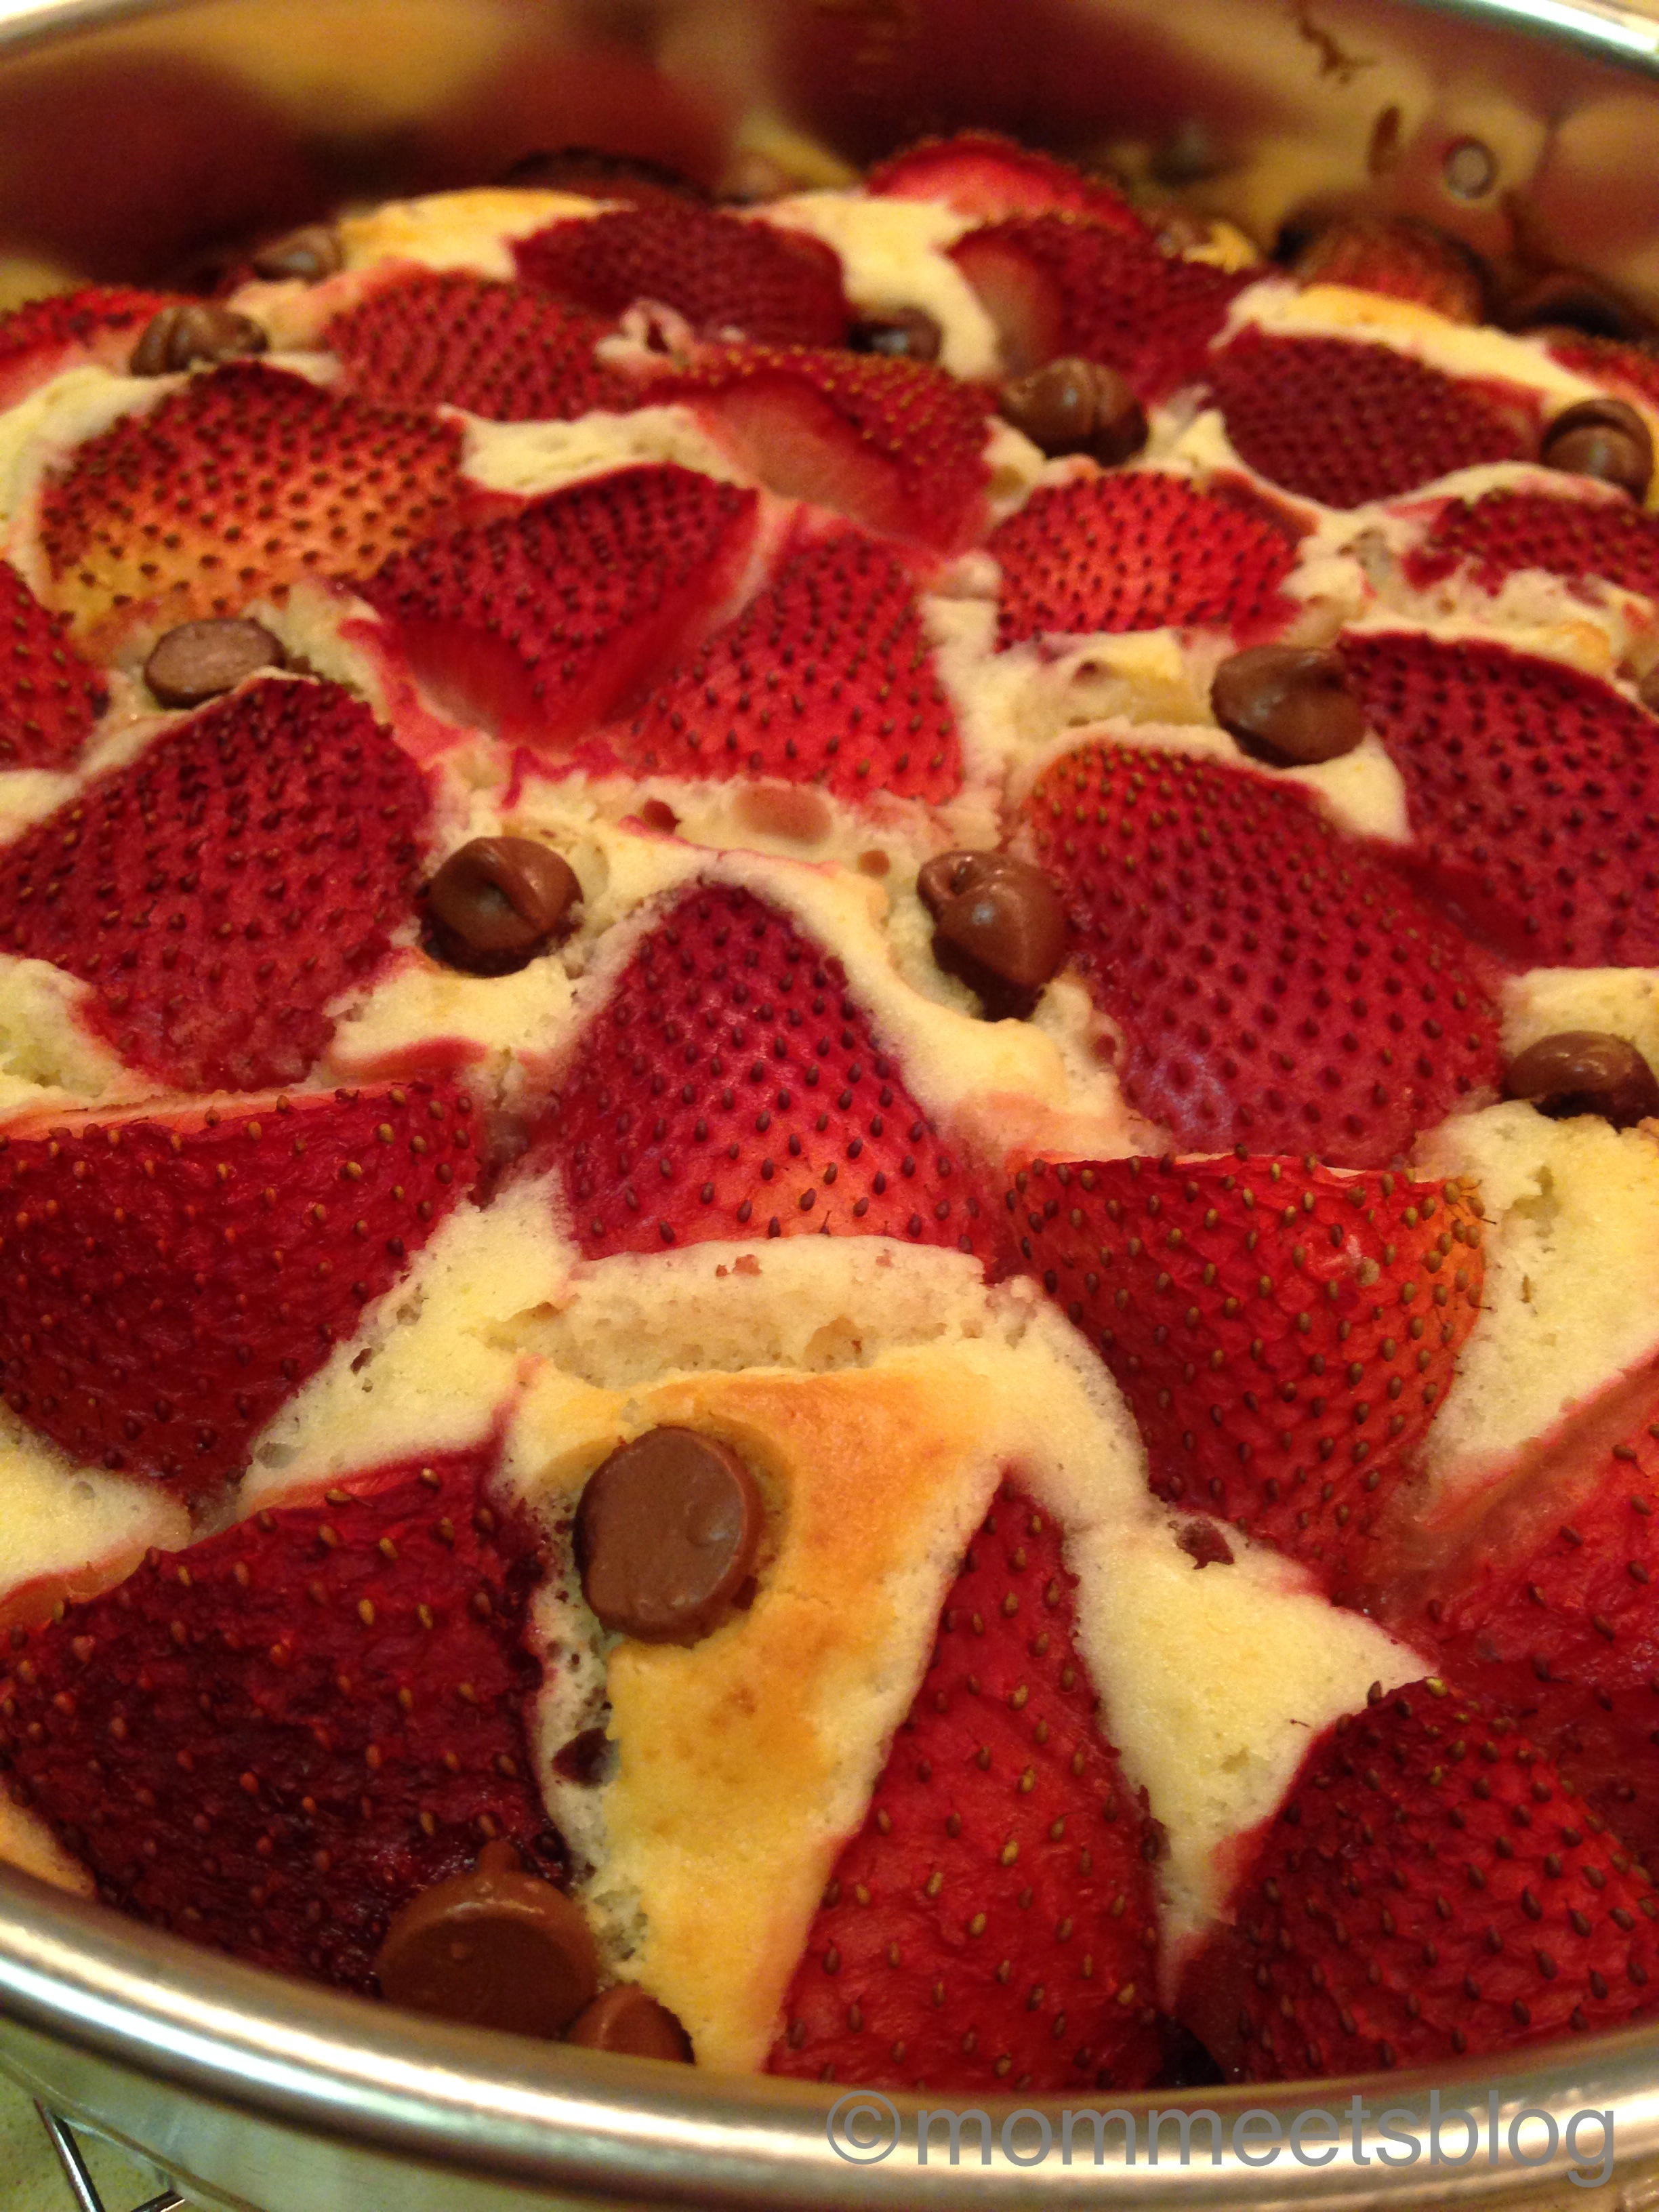
 Fresh out of the oven. . . smells heavenly!

Strawberry Chocolate Chip Cake - Mom Meets Blog

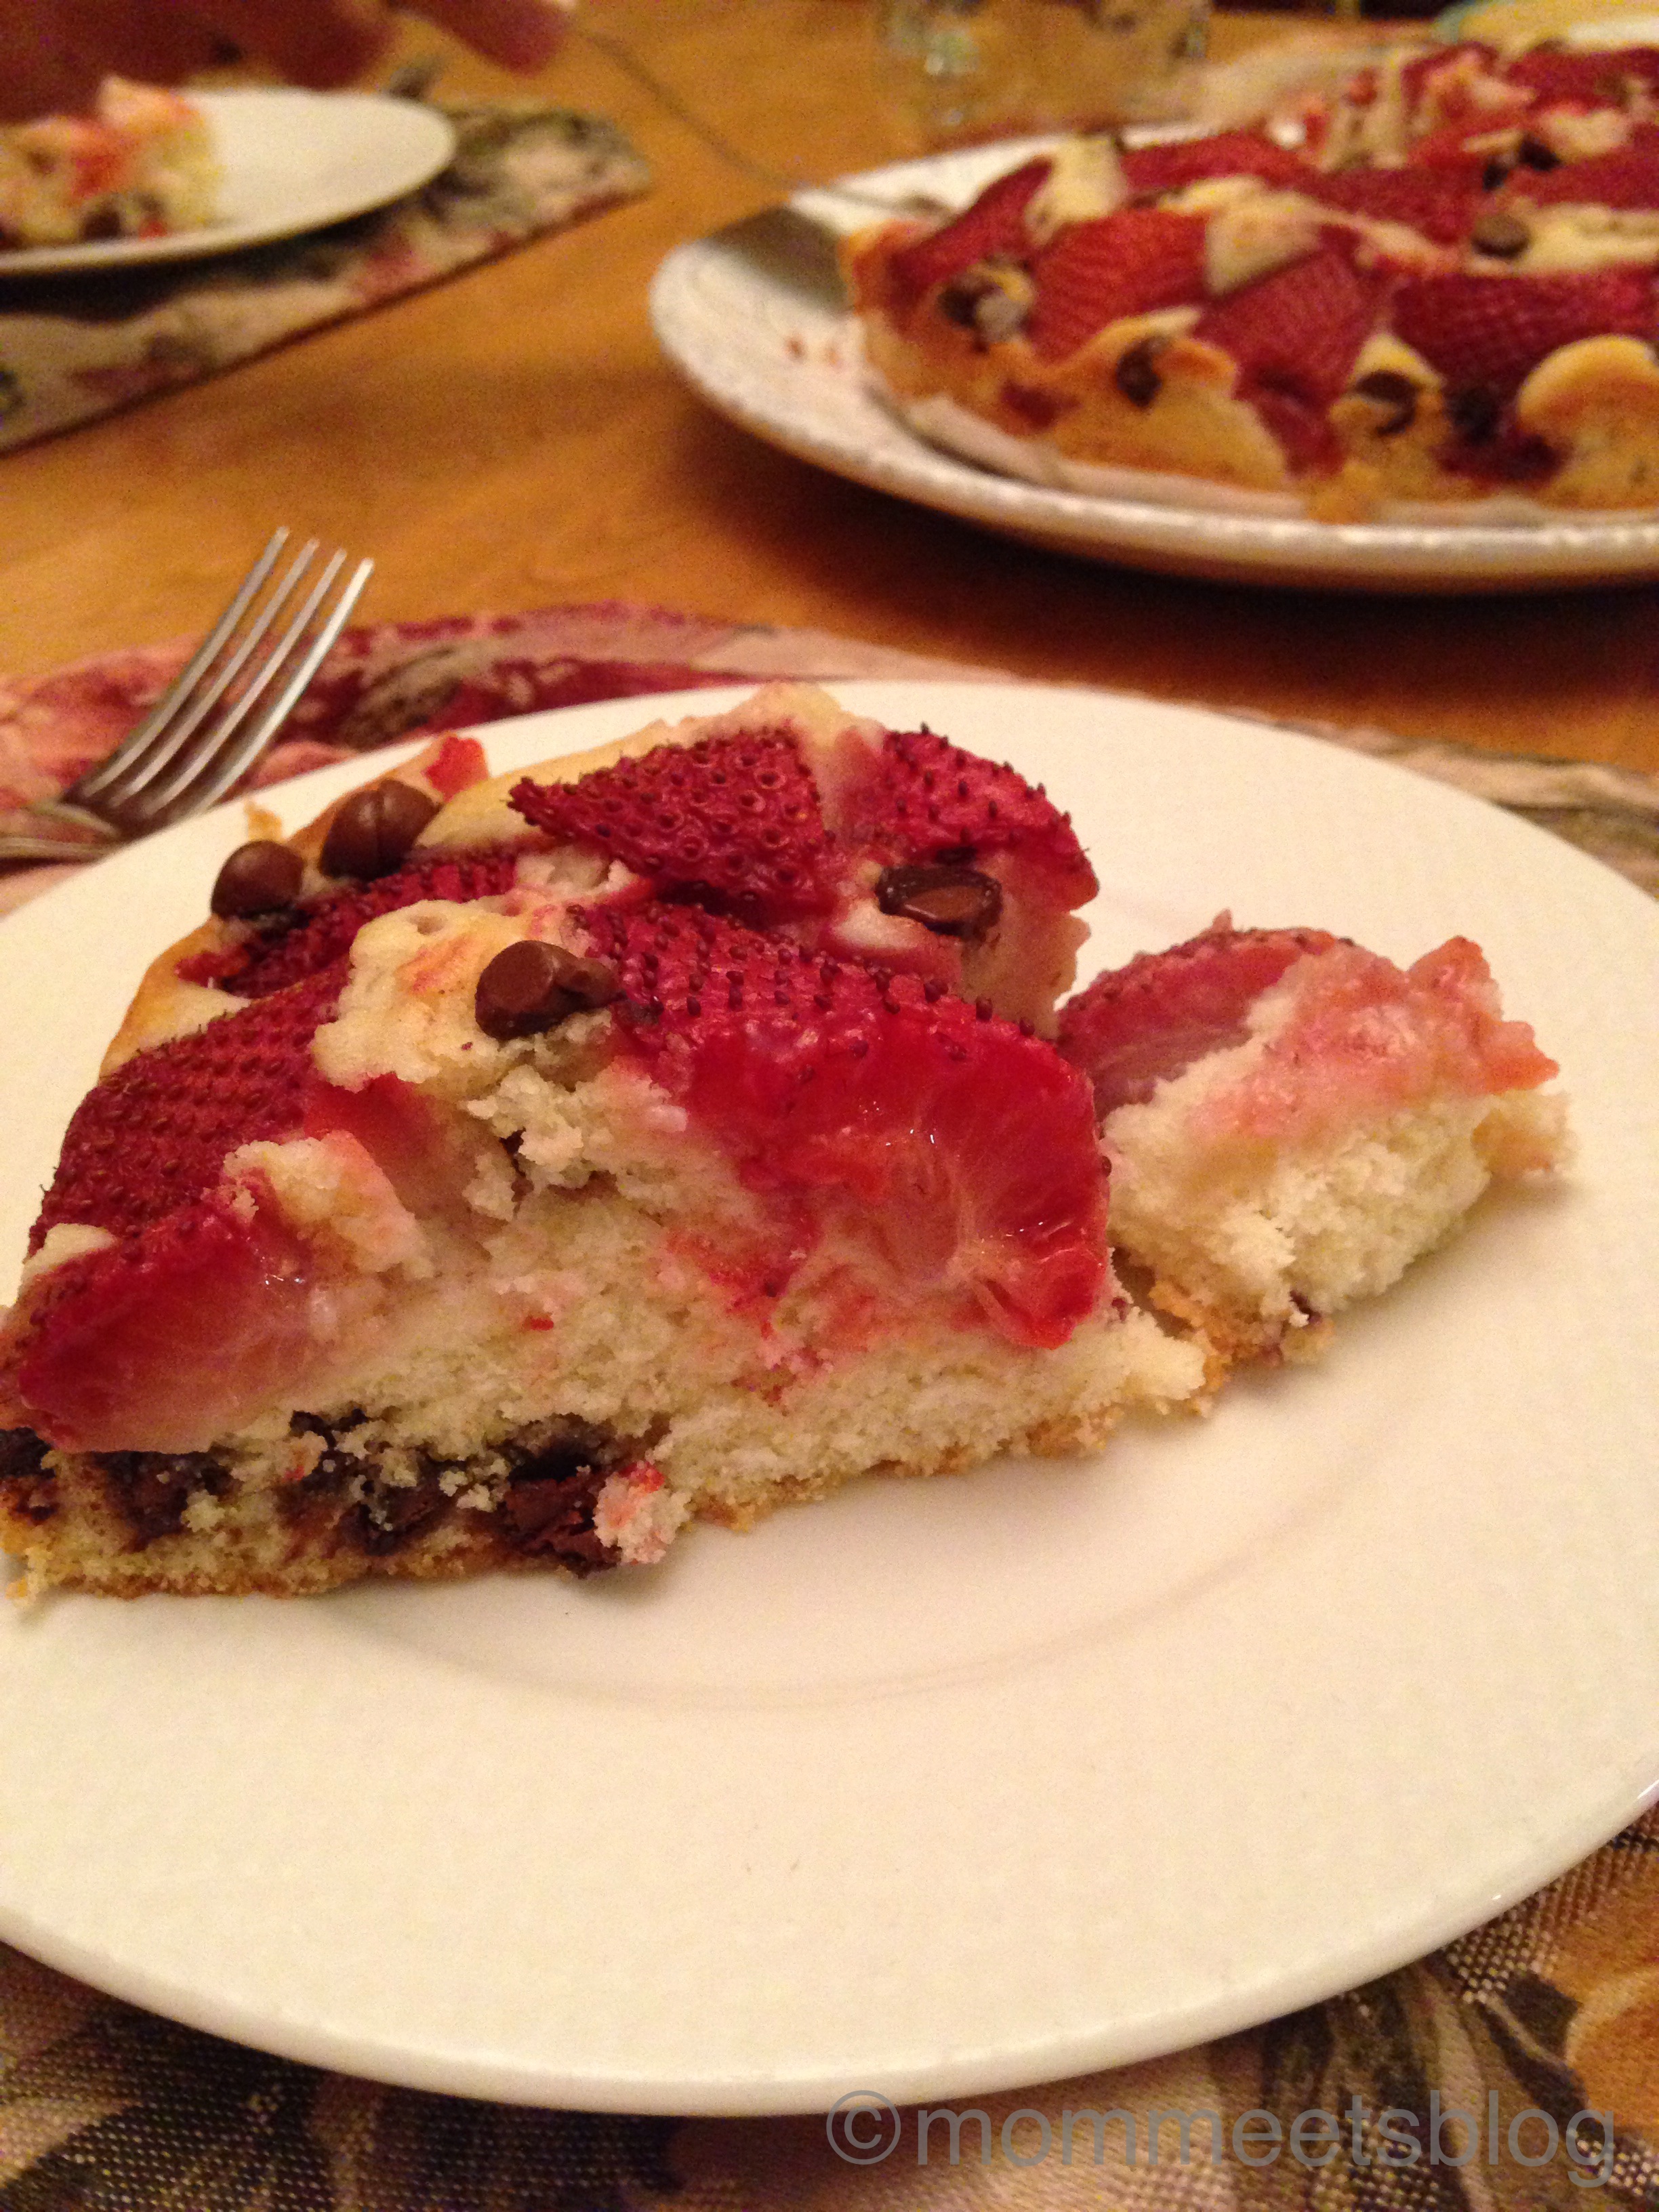
Strawberry Chocolate Chip Cake –  it’s what’s for dessert! Thanks, Pinterest!

Visit me on Pinterest! What are your favorite Pinterest successes (or fails)? Let me know in the comments!

Empanadas Step by Step

One of my favorite dishes to make for special occasions are empanadas, or meat pies.  They are a traditional food in my family during the Christmas season and are always a big hit at parties and pot luck dinners.  When my son was in elementary school his Spanish class looked forward to them every year.  These tasty little meat pies are easy to make and you can tweak all the seasonings to your own taste.  The best part is you can do all the prep work the night before and fry them when everyone’s ready to eat.

Here I’ll take you through the process step by step:

empanadas step by step

Step 1:  The first step is to make the sofrito – this is the seasoning in which you will cook the meat filling.  You can use these measurements as a guide, there are no strict rules when making sofrito – at least not for me!  If you like a little more red bell pepper than green or more cilantro than flat leaf parsley, go for it!

2 red bell peppers

2 green bell peppers

1 Spanish onion

3 Roma tomatoes

2-3 cloves of garlic

1/2 cup of flat leaf parsley

1/2 cup  cilantro

Sea salt

Pepper

Ground coriander seed

Ground cumin

Packet of Sazon

I use the food processor to dice the veggies and then add the spices to taste.  I like to make a big batch of this and freeze it in small quantities (about 4-5 tablespoons) for use in soups, stews, beef and chicken dishes – I added 4 tablespoons to a pot of arroz con gandules (yellow rice with pigeon peas) I made for Christmas Eve dinner and it was delicious.

Step 2:  Now for the meat filling.  Start with 1lb. of ground sirloin or meatloaf mix, seasoned with salt and pepper or adobo.   Add 2 tablespoons of olive oil to a frying pan; when it’s sizzling add about 4 tablespoons of sofrito.  Stir that for about a minute and then add your meat, breaking it up and stirring until cooked through.

Step 3:  I use Goya Dough Discs for Empanadas to make the pies.  They’re readily available in most major supermarkets and should be easy to find.

Steps 4 & 5:  Place a disc on waxed paper on a cutting board to keep it from sticking.  Place about a spoonful of meat in the middle of the disc as shown.

Step 6:  Fold over the disc into a crescent shape, pressing down on the edges of the disc with your fingers to seal.

Step 7:  Press the sealed edges of the empanada with the tines of a fork to secure the seal.

Step 8:  Here’s what your empanadas should look like. I usually make them ahead up to this point and put them in the refrigerator until I’m ready to cook them, and make between 12 – 20 empanadas at a time.

Step 9:  When you’re ready to fry them, add enough canola oil to a heavy frying pan to cover the empanadas; heat the oil to sizzling and carefully place the empanadas in the oil; fry until each side is golden brown as shown.

Empanadas also make great appetizers:  cut the dough disc in half, fill and fold into little triangles as shown below.  They are easy to tailor to any taste level from mild to spicy and are always a welcome addition to any table – maybe add them to your Super Bowl menu this year!

empanadas final

Fifty Shades of Nutella

I’m standing at the kitchen counter about to start dinner.  I open the cabinet to round up the ingredients for this evening’s meal and I see it, that seemingly innocent white-lidded jar, beckoning my attention.  I look away and continue gathering my supplies, but its call is too great to ignore.  I remove the Nutella  from the cabinet and slowly twist off its lid.  I open the drawer below and grab a spoon.  I put  the jar on the counter and hold it in place with one hand as I dip the spoon into the jar with the other, its contents yielding against the touch of the stainless steel.  I raise the spoon to my lips, closing my eyes and inhaling its familiar, delicate fragrance.  As it finds its way into my mouth, this intoxicating concoction slides off the spoon and onto my tongue, enveloping it like a silky blanket, the hint of hazelnut providing the perfect counterpoint to the smooth, velvety chocolate.  I open my eyes and, staring into the cabinet, inspiration strikes – dare I reach for the peanut butter?  My taste buds shiver at the thought.  No, I decide as my inner goddess pouts, that’s too much for now.  “Perhaps another time”, I can almost hear the peanut butter grinning salaciously.  I plunge the spoon into the jar again and again, greedily devouring the Nutella like a . . .

A small voice shakes me out of my reverie.  “Is dinner almost ready?” my son calls out from the living room.  I look down sheepishly at the jar in my hand and realize I’ve just consumed 600 calories worth of Nutella and we haven’t even had dinner yet.  I put the jar down and knot my fingers on the counter, chastising myself over my loss of control.  As I bite my lower lip, my subconscious smirks at me over her half-moon specs and clucks “A moment on the lips, no matter how sweet, a lifetime on the hips.”

I roll my eyes at her and angrily throw the spoon into the sink.  I shove the jar back in the cabinet, vowing to never lose control like that again (at least until the next time I open the cabinet).  Oh Nutella, you are a cruel master. . .

latersbabytypewriter-700x700

Photos courtesy of Google Images and nutellachocolate.com